


Webcam

Setup
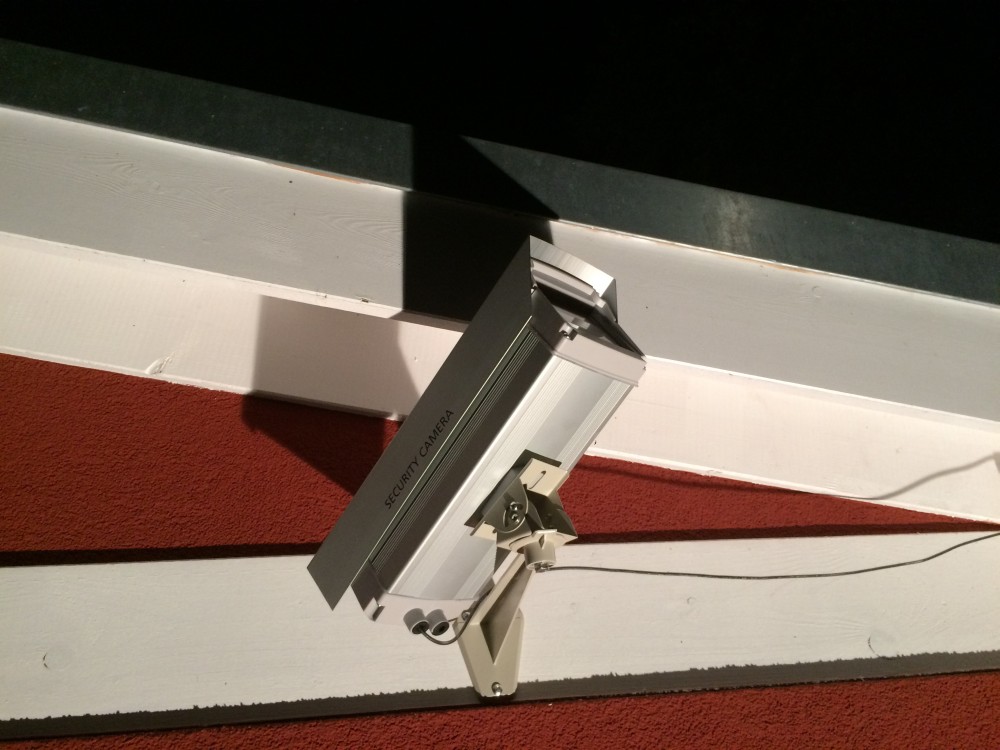
Kamerageh‰use.
F¸r die Webcam kommt die Raspberry Pi Camera v2.1 in Verbindung mit einem Raspberry Pi Model B zum Einsatz. Es besitzt eine Auflˆsung von maximal 8 MP, bildet im 4:3-Verh‰tlnis ab und hat ein Vollformat-Brennweiten‰quivalent von ca. 29 mm. Im manuellen Belichtungsmodus kˆnnen maximal 10.0 s Belichtungszeit und ISO 800 gew‰hlt werden. Untergebracht ist die Kamera in einem Auflengeh‰use einer g¸nstigen ‹berwachsungskameraatrappe, wie sie bei Ebay, Amazon etc. erh‰ltlich sind. Zwar h‰lt diese nicht 100% dicht, da aber die Raspberry-Platine auf einer erhˆhten Montageplatte befestigt ist, kann im Geh‰useboden angesammeltes Wasser nicht gef‰hrlich werden. ‹ber einen WLAN-Stick ist der Pi mit dem Internet und Heimnetzwerk verbunden.
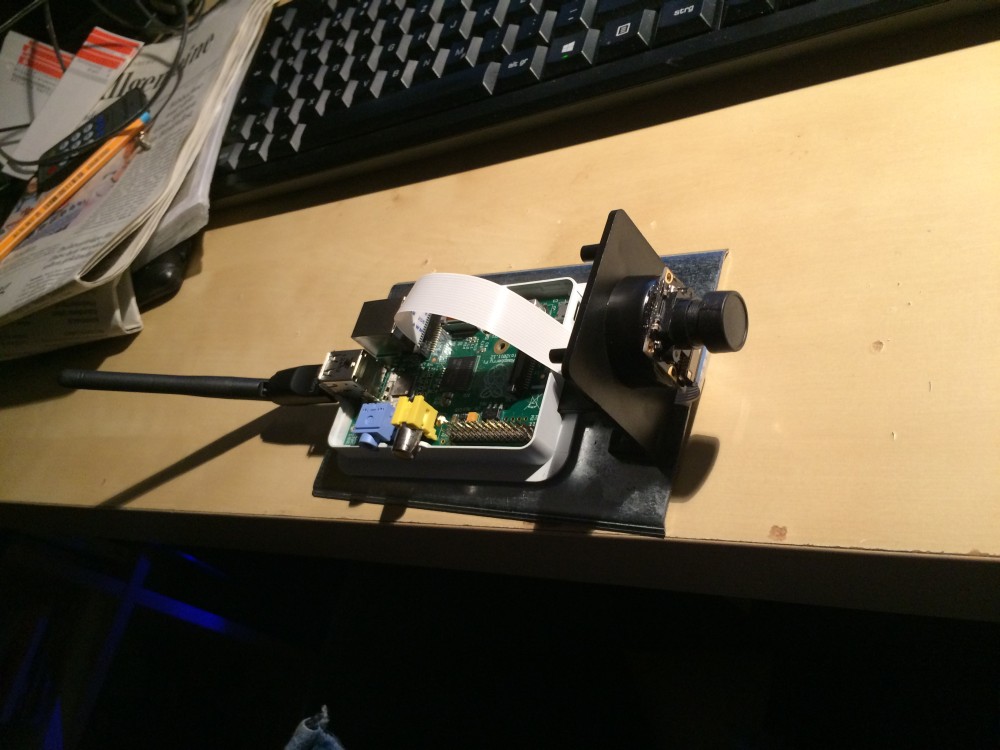
Innereien der Webcam.
Gesteuert wird die Webcam ¸ber ein ¸berschaubares Python-Script, welches die Kamera mit dem picamera-Paket ansteuert und bis zu 6 Bilder/Minute aufnimmt. Da die Kamera aber nur ¸ber den manuellen Modus ihre maximale Belichtungszeit von 10 s erreicht, habe ich in das Script einen Belichtungsalgorithmus eingebaut, der weiter unten aufgef¸hrt ist. Es ermittelt die Helligkeitswerte des zuletzt aufgenommenen Bildes und korrigiert den ISO-Wert und die Belichtungszeit f¸r die n‰chste Aufnahme. Die unten gezeigte Version ist eine abgespeckte Variante, die ich f¸r ein anderes Webcam-Projekt mit Bildarchiv und einer vorlaufenden Initialisierungsschleife implementiert habe, weshalb die ein oder anderen merkw¸rdig erscheinenden Inkonsistenten oder obsolete Zeilen auftauchen. Wer zum Script weitere Fragen oder Anregungen hat, kann sich mit mir gern ¸ber das Kontaktformular in Verbindung setzen.
Der Code sieht wie folgt aus:
#!/usr/bin/python
#
#Python-Script for capturing images repeatedly with the RPi-Camera
#2017-05-02
#Alexander Buetow

#+++Description+++

#The script controls the Raspberry Pi Cam in manual mode and takes a picture
#every 10s (configurable).
#
#Exposure is controlled by a costum logic, which sets the shutter speed and ISO
#based on the brightness information of the last image.
#
#To avoid image grain, ISO should be as low as possible (lower limit 100,
#configurable). If the sun sets and the shutter speed has reached its upper
#limit of 8s (configurable), the ISO gets adjusted accordingly. If it gets
#brighter, ISO gets lowered until the lower limit is reached. If the brightness
#still rises, shutter speed decreases.

#+++Libraries+++

from time import sleep,gmtime,strftime,time #some time functions
import os #to do system commands
from picamera import PiCamera #controls the Pi Cam
from PIL import Image, ImageStat  #image processing library
from PIL.ExifTags import TAGS #zum auslesen der Exif-Daten
from fractions import Fraction

#+++Configuration+++

from conf import * #loads in the configuration ini

#+++Functions+++

def get_im_info(image):
    """
    Puts out a tuple with the following (Exif) information data:
        brt - perceived mean brightness [0,255]
    """
    r,g,b = ImageStat.Stat(image).mean #get mean values for rgb
    brt = (0.2126*r)+(0.7152*g)+(0.0722*b) #brightness calculation

    return(brt)

def calc_corr(brt_lim,brt,exp,exp_min,exp_max,
	      iso,iso_min,iso_max,t):
    """
    Calculation and setting of new exposure correction values for new image
    input:
        brt_lim - brightness limit value, tuple of 2
        brt - actual brightness of an image [0,255]
        exp - actual exposure time/shutter speed
        exp_min - exposure/shutter speed minimum
        exp_max - exposure/shutter speed maximum
        iso - actual ISO
        iso_min - ISO minimum
        iso_max - ISO maximum
        t - trim setting, as set in the configuration
    """

    #To avoid image grain, the ISO has to be as low as possible (lower limit).
    #If the sun is gone and the shutter speed has reached its upper limit, the
    #ISO gets adjusted acordingly. If it gets brighter, ISO gets lowered until
    #the lower limit is reached. If the brightness still rises, the shutter
    #speed decreases.

    #First: generate exposure correction multiplier, if light changes quickly
    #and exposure time has to be set with a bigger step.
    m=int(abs(brt_lim[1]-brt)*t)

    if brt < brt_lim[0]:
        if exp == exp_max and iso < iso_max:
            iso=iso+(iso/100)*m
            if iso > iso_max:
                iso=iso_max
            camera.iso = iso
        elif exp < exp_max:
            exp=exp+(exp/100)*m
            if exp > exp_max:
                exp=exp_max
            camera.shutter_speed = exp
    elif brt > brt_lim[1]:
        if exp == exp_max and iso > iso_min:
            iso=iso-(iso/100)*m
            if iso < iso_min:
                iso=iso_min
            camera.iso = iso
        elif exp > exp_min:
            exp=exp-(exp/100)*m
            if exp < exp_min:
                exp=exp_min
            camera.shutter_speed = exp

    return(exp,iso,m) #returns a tuple with three values

def open_log(path):
    """
    Creates daily logfiles and opens them
    input:
       path - where the logfile should be stored
    """

    #create hourly log string
    log_tar = path + 'capture_' + strftime('%Y%m%d', gmtime()) + '.log'
    log_file = open(log_tar, 'a')

    return(log_file)

#+++Programe+++

#initialisation:
if wb == '': wb = 'auto'

#try to mount RAM workspace for temporarly saving images while initialisation
#RAM is used to reduce wear on storage devices and to reduce latency

ramdir='/media/ramdisk/'
try:
    os.system('sudo mount -t tmpfs none ' + ramdir)
except:
    print('WARNING: Couldnt mount ramdisk. Writing on disk.')
    ramdir=maindir

#enable logging if turned on
if debug:
    f = open_log(ramdir)
    f.write(strftime('%Y-%m-%d %H:%M:%S : ', gmtime()) +
            '+++CAPTURING STARTED (debugging enabled)+++\n')
    f.write('Settings:	ISOmin: ' + str(iso_min) + ' | ISOmax: ' + str(iso_max) +
            '\n')
    f.write('Shuttermin: ' + str(exp_min) + ' | Shuttermax: ' + str(exp_max) +
            '\n')
    f.write('White Balance: ' + wb + ' | brightness range: ' + str(bright) +
            ' | multip. trim: ' + str(trim) + '\n')
    f.write('Saving directory: ' + ramdir + '\n')
    f.close()
    multi = 'NA'

init_im = ramdir + 'init.jpg' #file string for init image
cp_im = ramdir + 'init_cp.jpg'

camera = PiCamera(resolution=full_res, framerate=Fraction(1,10)) #start camera module

sleep(10) #take some time for initialisation of the camera interface

camera.awb_mode = wb #set white balance
camera.iso = iso_min #set init iso
camera.shutter_speed = exp #set init exposure time
camera.exposure_mode = 'off'
camera.vflip = True #rotate image
camera.hflip = True
camera.drc_strength = drc #set drc mode
im_exp = exp
im_iso = iso_min

#Initialisation complete, start taking and storing images as configured!

while True: #taking pictures forever
    sec = int(strftime('%S', gmtime())) #unix epoch
    unix = int(time())
    if sec%intv == 0: #if modulo = 0, do something
        #take raw image
        try:
            camera.capture(init_im, quality=qual)
	except:
	    sleep(1)

        #split the process: scale the image in a seperate process, save it on
        #the attached storage device and go on
        if sec%60 == 0 or im_exp >= 2000000: #upload every 60s
	    os.system('cp ' + init_im + ' ' + cp_im)
            os.system('./convert_and_upload.sh ' + str(unix) + ' ' + str(im_iso) + ' ' + str(round(float(im_exp)/1000000,3)) + ' &')

        #get brightness info
        im_brt=get_im_info(Image.open(init_im))

	if debug:
	    f = open_log(ramdir)
            f.write(strftime('%Y-%m-%d %H:%M:%S : ') +
                    'Image saved | Brightness: ' + str(int(im_brt)) + ' | ISO: ' +
                str(im_iso) + ' | Shutter: ' + str(im_exp) + ' | Multiplier: ' +
                str(multi) + '\n')
	    if sec%60 == 0 or im_exp == exp_max:
	        f.write(strftime('%Y-%m-%d %H:%M:%S : ') + 'Upload and convert image \n')
            f.close()

        #Calculating and setting corrected values for next round
        im_exp,im_iso,multi=calc_corr(brt_lim=bright,brt=im_brt,exp=im_exp,
                                        exp_min=exp_min,exp_max=exp_max,
                                        iso=im_iso,iso_min=iso_min,iso_max=iso_max,t=trim)
    else:
        sleep(1)
Die Bilder werden ¸ber ein kleines Shell-Script f¸r die Website verarbeitet. Dabei wird mit Hilfe des convert-Befehls eine Webversion und ein 200px Thumbnail jeweils mit Zeitstempeln sowie Infos zur aktuellen Belichtung erstellt. Beim anschlieflenden Upload werden die tempor‰ren Dateien zun‰chst hochgeladen und danach umbenannt. Das verhindert, dass manchmal unvollst‰ndig hochgeladene Bilder angezeigt werden. Zudem wird alle 15 min ein Bild im Archiv abgelegt und Bilder, welche ‰lter als 48 h sind, gelˆscht.
So sieht das alles aus:
#!/bin/bash
#Upload Script for brieselangwetter.de
#Alexander Buetow
#2017-05-02

UNIX=$1
IM_ISO=$2
IM_EXP=$3

SV_INT=900 #image saving interval in s for history, 15 min in this case

LOGIN='foo@bar.com'
TAR='/baz/cam'

if [ $IM_EXP == '0.0' ]
then
        IM_EXP='<0.001'
fi

TIMES=$(date -d @$UNIX '+%d.%m.%Y  %H:%M Uhr')
T_STR=$(date -d @$UNIX '+%Y%m%d_%H%M')

MNT="/media/ramdisk"

convert $MNT/init_cp.jpg \
        -resize 1200 \
        -quality 90% \
        -fill '#0008' -draw 'rectangle 0,870,1200,900' \
        -gravity SouthWest -pointsize 24 -fill grey -annotate 0 "\ Wetterstation Brieselang\ " \
        -gravity South -annotate 0 "\ Belichtungszeit: $IM_EXP s  ISO: $IM_ISO\ " \
        -gravity SouthEast -annotate 0 "\ $TIMES\ " \
        $MNT/temp_full.jpg

convert $MNT/temp_full.jpg \
        -resize 200 \
        -quality 70% \
        -gravity SouthEast -pointsize 14 -fill white -annotate 0 "\ $TIMES\ " \
        $MNT/temp_thumb.jpg

scp $MNT/temp_{full,thumb}.jpg $LOGIN:$TAR
ssh $LOGIN "bash -c 'cd $TAR; mv temp_full.jpg cam_full.jpg; mv temp_thumb.jpg cam_thumb.jpg;
                find ./hist -mtime +2 -exec rm {} \;'"

if [ $(python -c 'print(int(round('$UNIX'/60)%('$SV_INT'/60)))') == 0 ]
then
        ssh $LOGIN "bash -c 'cd $TAR
                cp cam_full.jpg ./hist/${T_STR}_full.jpg
                cp cam_thumb.jpg ./hist/thumb/${T_STR}_thumb.jpg'"
fi
Zum Schluss die Konfiguration:
#Configuration File for Raspberry Pi Webcam Initialisation - manual mode
#2017-05-02
#Alexander Buetow

#maindir = '/media/hdd/metcam/prod/'
#maindir = '/media/ssd/metcam/prod/'
maindir = '/media/ramdisk/'

#capturing/saving-interval, in s.
intv = 10

#resolution of the raw image (width, height). Don't change, unless you change
#the camera module with an other image sensor.
#IMPORTANT: If you change the original aspect ratio of the image, the image
#will have color artifacts. This bug lies within the picamera module and cannot
#been fixed.
#full_res = (3280,2464) #Raspberry Pi Camera v2.1
full_res = (1200,900)

#image quality
qual = 90

#initialisation options
iso = 100 #init ISO
iso_min = 100 #min ISO
iso_max = 800 #max ISO
iso_step = 20 #stepping of ISO value for exposure adjusting

exp = 100 #init exposure time, in us
exp_min = 100 #min exposure time, in us
exp_max = 10000000 #max exposure time, in us

#white balance
#the following white-balance modes are selectable:
    #
    #'off' - Turn off white balance calculation
    #'auto' - Automatic mode (default)
    #'sunlight' - Sunny mode
    #'cloudy' - Cloudy mode
    #'shade' - Shade mode
    #'tungsten' - Tungsten lighting mode
    #'fluorescent' - Fluorescent lighting mode
    #'incandescent' - Incandescent lighting mode
    #'flash' - Flash mode
    #'horizon' - Horizon mode
wb = 'auto' #white-balance mode

#drc strengh
#options:
    #'off' - off
    #'low' - low
    #'medium' - medium
    #'high' - high
drc = 'off'

#target brightness level range (min, max), values between 0 and 255.
#If the range is narrow, the exposure algorithm will change
#the exposure settings more aggressive when light conditions change (low hysteresis).
bright = (150,150)

#trim-setting for the image multiplier, values greater-equal than 0. Low settings make the image
#exposure correction for the following image less aggressive. Settings higher then 1.5 or so is
#not recommended and can result in "overshooting" the exposure setting for the following image.
trim = 1

#debug mode (on = True, off = False) - Debugging log is saved in the specified
#maindir/image saving directory.
debug = False